14-12-2021
How to make deployments on Tableau Server using a DevOps approach?
por Andreia Barros, Business Intelligence Developer @ Xpand IT
Contained within the software development life cycle, there are three major steps that every developer needs to take — development, testing and deployment.
In Tableau, although more concerned with dashboards and databases/Data Sources, the above process is still vital to ensure the most important aspect of collecting and using data — data quality.
To implement our process, we need to work in three distinctly different environments:
- Development (where the developer creates their Data Sources and Workbooks)
- Staging (where the Data sources and workbooks are deployed by developers to be tested by QA analysts — in other words, the Testing environment)
- Production (where the Data Sources and Workbooks are finally deployed to be used by end users)
All the above can be implemented easily using Tableau Server/Online with two possible approaches — multiple instances of Tableau Server or one instance of Tableau Server with multi-tenancy (multiple sites on the same Tableau Server).
Tableau have already talked about the necessity of setting up multiple environments to ensure data quality, and you can see their macro approach in this blog.
So, what is the main problem?
How can we migrate the content from one instance of Tableau to another? Can it be done automatically? Or does the developer/QA analyst need to download content from one Tableau Server and upload it to another one?
Goal
The goal is to create a process that will manage the migration of content automatically, so that the user does not have to handle it manually. This migration will include Tableau artefacts, such as Data Sources, Workbooks and Projects, and will also cover the permissions assigned to each of these.
There is also a second goal that is to ensure the versioning of these artefacts and permissions.
Use cases
Use case 1 — Artefact creation/update
A user created or updated an artefact in the Staging environment. These changes have to be translated into the Production environment
Use case 2 — Permissions changed
A user changed the permissions to an artefact in the Staging environment. These changes have to be translated into the Production environment, to ensure the safety of the artefacts.
Use case 3 — Artefact deletion
A user deleted an artefact in the Staging environment. That change should translate in the Production environment.
All the changes of the Use Cases need to be translated into the production environment.
Migration types
The data migration can be split into two types:
- Full migration— all artefacts will be migrated; the final machine will be a copy of the source (usually between Staging → Production)
- Partial migration— there are some filters that divide the content that is ready to be migrated from the rest (usually between Development → Staging)
This separation is important because the migration method to apply will be different for each one.

In a Partial Migration, the content creator will have the job of creating a “Sandbox” folder in Tableau Server to contain all the artefacts that have been approved and are ready to be migrated. At the end of this migration, the Staging environment will be an exact copy of this folder.
Solution
The solution will be divided into three major steps:
- Artefact migration (download and upload)
- Permissions migration
- Artefact removal
The process needs to be divided into the steps above because the implementation of each step is distinct and will rely on different platforms and methods.
Artefact migration
Solution — Use TabMigrate, a tool developed by Tableau, to download and upload the artefacts.
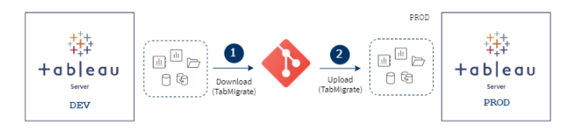
This process will have 5 major steps:
- Delete all the content present in the folder defined on TabMigrate for the download
- Download the artefacts, using the TabMigrate “siteExport” command
- Add the artefacts to the git repository
- If you are using a different folder to upload content, pull the repository content into that folder
- Upload the artefacts to the Tableau Server, using the TabMigrate “siteImport” command
During this process we are going to show an example on a Windows machine.
TabMigrate download
C:\Users\{User}\AppData\Local\Apps\2.0\NL4VADC2.ZZ7\MPVM8832.QG4\tabr..tion_0000000000000000_0001.0000_47e7c75dc9f35068\TabRESTMigrate.exe

    -command siteExport

    -fromSiteUserId [email protected]

    -fromSiteUserPassword *****

    -exportDirectory C:\path

    -fromSiteUrl https://dev.tableau.com/#/site/

    -fromSiteIsSystemAdmin true

    -backgroundKeepAlive false

    -logVerbose true

    -downloadInfoFiles true

    -exportOnlyTagged prod (opcional)

    -exportOnlyTaggedRemoveTag true (vem com o export tag, senão é opcional )

    -exportSingleProject Sandbox (opcional)

    -logFile C:\path\siteExport_log.txt

    -errorFile C:\path\siteExport_errors.txt

    -exitWhenDone true
This command allows the user to define the following variables:
- fromSiteUserId — Tableau server username
- fromSiteUserPassword — Tableau server password
- fromSiteUrl — Tableau Server site path, leave “https://dev.tableau.com/#/” if it is the default
- exportDirectory — Local directory to which TabMigrate will download the content
It also allows the user to define a specific folder, using “exportSingleProject”. Or a specific tag using the “exportOnlyTagged” variable.
TabMigrate Upload
C:\Users\{User}\AppData\Local\Apps\2.0\NL4VADC2.ZZ7\MPVM8832.QG4\tabr..tion_0000000000000000_0001.0000_47e7c75dc9f35068\TabRESTMigrate.exe

    -command siteImport

    -toSiteUserId afpb

    -toSiteUserPassword *****

    -importDirectory C:\path

    -toSiteUrl https://dev.tableau.com/#/site/site

    -toSiteIsSiteAdmin true

    -remapDataserverReferences true

    -remapContentOwnership true

    -logVerbose true

    -dbCredentialsFile C:\path1\credentials.xml

    -logFile C:\path\siteImport_log.txt

    -errorFile C:\path\siteImport_errors.txt

    -manualStepsFile C:\path\siteImport_manualSteps.csv

    -exitWhenDone true
This command allows the user to define the following variables:
- toSiteUserId — Tableau Server username
- toSiteUserPassword — Tableau Server password
- toSiteUrl — Tableau Server site path; leave “https://dev.tableau.com/#/” if it is the default
- importDirectory — the local directory from which TabMigrate will read content for upload
When uploading Data Sources or Workbooks connected to Data Sources, you need to add an XML file with the credentials (dbCredentialsFile).
<xml>

<credential contentType="workbook" contentProjectName="Test Site Import" contentName="test.twbx" dbUser="SimpleUser" dbPassword="q.123456" credentialIsEmbedded="true"> </credential>

<credential contentType="workbook" contentProjectName="Test Site Import" contentName="test2.twbx" dbUser="SimpleUser2" dbPassword="q.1234567" credentialIsEmbedded="false”> </credential>

<credential contentType="datasource" contentProjectName="Test Site Import" contentName="test2.tds" dbUser="SimpleUser3" dbPassword="q.12345678" credentialIsEmbedded="true"> </credential>

</xml>
There are some things that you need to consider regarding the permissions:
- When you upload an artefact, if the user of that artefact does not exist on the Tableau Server that you are uploading to, you can set the option “remapContentContent” to false. And TabMigrate will no longer try to find that user and will simply make the ToSiteUser the owner of that content.
- Where the artefact already exists on the Tableau Server that you are uploading to, the artefact remains with the permissions already defined there.
If the artefact does not exist on the Tableau Server that you are uploading to, the artefact will assume the permissions of your default Project.
TabMigrate inventory
C:\Users\User\AppData\Local\Apps\2.0\NL4VADC2.ZZ7\MPVM8832.QG4\tabr..tion_0000000000000000_0001.0000_47e7c75dc9f35068\TabRESTMigrate.exe

    -command siteInventory

    -fromSiteUserId [email protected]

    -fromSiteUserPassword *****

    -inventoryOutputFile C:\path\siteInventory.csv

    -fromSiteUrl https://dev.tableau.com/#/site/testesite

    -fromSiteIsSystemAdmin true

    -logVerbose true

    -logFile C:\path\siteExport_log.txt

    -errorFile C:\path\siteExport

    -exitWhenDone true
This command allows the user to define the following variables:
- fromSiteUserId — Tableau Server username
- fromSiteUserPassword — Tableau Server password
- fromSiteUrl — Tableau Server site path, leave “https://dev.tableau.com/#/” if it is the default
- inventoryOutputFile — local directory to which TabMigrate will generate and download the CSV inventory
If the user is an Admin, he can change the flag “fromSiteIsSystemAdmin” to true, and TabMigrate will also generate the site users and site info information.
Permissions migration
There are two main solutions to the permissions case:
- The user blocks the Project permissions on the target and source machines, so that when the artefacts are migrated from the source, the permissions applied to them stay the same as those defined on the target Tableau Server (manual/automatic)
- The user does not block the permissions, so there is a need for a process that will migrate the permission from the source to the target Tableau Server instance (automatic)
Permissions blocked
The creator defines the permissions to the folder and then blocks them. This can be done manually or via REST API.

If the user decides to use the REST API, they will need to implement two steps:
- Define the permissions that he would like to apply, and apply them to the main Project (REST API — Add project permissions)
- Update the Project field “contentpermissions” to the value “LockedToProject”, to block the permissions (REST API — Update Project)
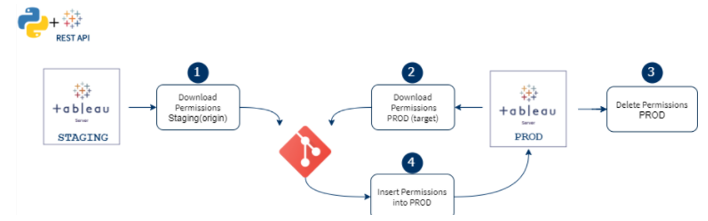
Permissions migration (automated)
This solution will be based on the REST API. We will use the REST API to retrieve the permissions from the origin that we want to migrate, and we will insert them on the target Tableau Server.
Currently, the REST API does not have a default operation to UPDATE permissions. To update the permissions on the target Tableau Server, first we will need to DELETE the permissions we want to replace and then INSERT the new ones.
Example (migrate Data Source permissions)
1 — Tableau Server sign-in
The first step is to sign in to Tableau Server to retrieve a token. You can do this using “username/password” or “personal_access_token_name/personal_access_token_secret”.
Then find the Personal Access token (which is the safest one), you need to log in to your Tableau Server as an admin, go to “Account Settings” and then create a new “Personal Access Token”.

After that, you can easily sign in to the Tableau server using the following python code:
REST API + Python – Login
#Define server name, version and site (empty if default)server_name = "{domain}"

version = "3.9"

site_url_id = ""

personal_access_token_name = "token_name"

personal_access_token_secret = "token_secret"

signin_url = "https://{server}/api/{version}/auth/signin".format(server=server_name, version=version)

payload = { "credentials": { "personalAccessTokenName": personal_access_token_name, "personalAccessTokenSecret": personal_access_token_secret, "site": {"contentUrl": site_url_id }}}

headers = {

    'accept': 'application/json',

    'content-type': 'application/json'

}

#Rest API call to login

req = requests.post(signin_url, json=payload, headers=headers, verify=False)

req.raise_for_status()

#Keep the token into one variable (token)

token = response["credentials"]["token"]

site_id = response["credentials"]["site"]["id"]

headers['X-tableau-auth']=token
2 — Download the permissions and save them to a CSV
There are 4 major steps to take into account
- Find out the datasource ID
- Call the REST API to download the datasource permissions (REST API — Query Datasource Permissions)
- This call will only retrieve the IDs from the users/groups, but we need to identify their names, to map them to the target Tableau Server
- Call the REST API to retrieve the information about the users/groups (REST API — Users and Groups)
- Download this information into a CSV
REST API — download permissions
# Get id by CSV

datasource_name = "example"

with open("C:path\\inventory.csv", "r") as filestream:

    for line in filestream:

        lines= line.split(",")

        if lines[3] == datasource_name:

            id = lines[2]

#Get permissions

permissions_url = "https://{server}/api/{version}/sites/{site_id}/datasources/{datasource_id}/permissions".format(server=server_name, version=version, site_id =site_id, datasource_id=id)

server_response = requests.get(url=permissions_url, data=None, headers=headers)

response1 = json.loads(server_response.content)

owner = response1["permissions"]["datasource"]

permissions = response1["permissions"]["granteeCapabilities"]

groups_of_permissions = response1["permissions"]["granteeCapabilities"]

#Transform the json into a list of permissions

a = 0

full_list = []

for group in groups_of_permissions:

    a = a + 1

    list = []

    for item in group.keys():

        if item == "group" :

            type1 = (group["group"]["id"])

            typedsc=item

        elif item == "user":

            type1 = (group["user"]["id"])

            typedsc=item

        else :

            j = []

            for type in group["capabilities"]["capability"]:

                j.append((type["name"],type["mode"]))

            list.append((type1, typedsc,j))

    full_list.append(list)

#Retrieve the name of the users/groups

users_url = "https://{server}/api/{version}/sites/{site_id}/users/".format(server=server_name, version=version, site_id=site_id)

groups_url = "https://{server}/api/{version}/sites/{site_id}/groups/".format(server=server_name, version=version, site_id=site_id)

users_response = requests.get(url=users_url, data=None, headers=headers)

users = json.loads(users_response.content)["users"]["user"]

groups_response = requests.get(url=groups_url, data=None, headers=headers)

groups1 = json.loads(groups_response.content)["groups"]["group"]

#Create final list and save into a CSV (datasource_id, datasource_name, type, user_id, username, permission_name, permission_mode)

final_list = []

for x in full_list :

    user_id=x[0][0]

    type=x[0][1]

    if type == "group":

        for group in (group for group in groups1 if group["id"]==user_id):

            uname = group["name"]

    else:

        for user in (user for user in users if user["id"]==user_id):

            uname = user["name"]

    for (name,mode) in x[0][2]:

        final_list.append([id,datasource_name, type, user_id, uname, name, mode])

 with open('C:\\path\\permissions_origin.csv', mode='w', newline='') as csv1:

    writer = csv.writer(csv1)

    writer.writerows(final_list)
Right now you have a CSV with all the permissions. This need to be executed both to the origin and the target Tableau Server:
- permissions_staging.csv (origin)
- permissions_production.csv (target)
3 — delete existing permissions on the target
Since we already have a CSV will all the data about the permissions we will delete, this task becomes very easy. With only the following steps:
- Get the permissions to delete
- Call the right REST API delete (REST API — Delete Datasource Permissions)
REST API + Python — delete permissions
#Get the permissions

with open('C:\\{path_to_file}\\permissions_origin.csv', 'r') as permissions:

    reader = csv.reader(permissions)

    permission = list(reader)

#Delete

for perm in permission:

    if perm[2] == "group":

        deleteURL = "https://{server}/api/{version}/sites/{site_id}/datasources/{datasource_id}/permissions/groups/{group_id}/{cap_name}/{cap_mode}" \

            .format(server=server_name, version=version, site_id=site_id, datasource_id=perm[0], group_id=perm[3],

                    cap_name=perm[5], cap_mode=perm[6])

        req = requests.delete(url=deleteURL, json=payload, headers=headers, verify=False)

    else:

        deleteURL = "https://{server}/api/{version}/sites/{site_id}/datasources/{datasource_id}/permissions/users/{user_id}/{cap_name}/{cap_mode}" \

            .format(server=server_name, version=version, site_id=site_id, datasource_id=perm[0], user_id=perm[3],

                    cap_name=perm[5], cap_mode=perm[6])
4 — insert the new permissions on the target
The permissions that will be inserted are already on the file “permissions_staging.csv”, but they are with the old ID, so we need to map them to the correct ID (target ID)
So, the steps will be:
- Get the permissions to insert
- Map them to the new ID
- Create an XML file with the permissions to add
- Call the REST API to insert them (REST API — Add datasource permissions)
REST API + Python — add permissions
#Get the users and groups ids

users_url = "https://{server}/api/{version}/sites/{site_id}/users/".format(server=server_name, version=version, site_id=site_id)

groups_url = "https://{server}/api/{version}/sites/{site_id}/groups/".format(server=server_name, version=version, site_id=site_id)

users_response = requests.get(url=users_url, data=None, headers=headers)

users = json.loads(users_response.content)["users"]["user"]

groups_response = requests.get(url=groups_url, data=None, headers=headers)

groups1 = json.loads(groups_response.content)["groups"]["group"]

inventory_lines = []

with open("C:\\path\\inventory.csv", "r") as filestream:

    for line in filestream:

        inventory_lines.append(line.split(","))

#Get the permissions to add and map them to the correct id

with open('C:\\path\\permissions_origin.csv', 'r') as permissions:

    reader = csv.reader(permissions)

    permission = list(reader)

permissions_ids = []

for perm in permission:

    if perm[2] == "group":

        for group in (group for group in groups1 if group["name"] == perm[4]):

            uid = group["id"]

    else:

        for user in (user for user in users if user["name"] == perm[4]):

            uid = user["id"]

    for lines in (lines for lines in inventory_lines if lines[3] == perm[1]):

        datasource_id = lines[2]

    permissions_ids.append([perm[2],datasource_id,uid,perm[5],perm[6]])

#Generate the XML and call the REST API

headers = {

    'X-tableau-auth': token,
}

for perm in permissions_ids:

    if perm[0] == "user":

        request_xml = ET.Element('tsRequest')

        permissions_xml = ET.SubElement(request_xml, 'permissions')

        datasource_xml = ET.SubElement(permissions_xml, 'datasource', id=perm[1])

        grantee = ET.SubElement(permissions_xml, 'granteeCapabilities')

        user_xml = ET.SubElement(grantee, 'user', id=perm[2])

        capabilities_xml = ET.SubElement(grantee, 'capabilities')

        capability_xml = ET.SubElement(capabilities_xml, 'capability', name=perm[3], mode=perm[4])

        token_url = "https://{server}/api/{version}/sites/{site_id}/datasources/{ds}/permissions" \

            .format(server=server_name, version=version, site_id=site_id, ds=perm[1])

        request_data = ET.tostring(request_xml)

        x = requests.put(url=token_url, data=request_data,headers=headers)

    else:

        request_xml = ET.Element('tsRequest')

        permissions_xml = ET.SubElement(request_xml, 'permissions')

        datasource_xml = ET.SubElement(permissions_xml, 'datasource', id=perm[1])

        grantee = ET.SubElement(permissions_xml, 'granteeCapabilities')

        group_xml = ET.SubElement(grantee, 'group', id=perm[2])

        capabilities_xml = ET.SubElement(grantee, 'capabilities')

        capability_xml = ET.SubElement(capabilities_xml, 'capability', name=perm[3], mode=perm[4])

        token_url = "https://{server}/api/{version}/sites/{site_id}/datasources/{ds}/permissions" \

            .format(server=server_name, version=version, site_id=site_id, ds=perm[1])

        request_data = ET.tostring(request_xml)

        x = requests.put(url=token_url, data=request_data, headers=headers)
Artefact deletion
The final step is to find out if there was any file that was deleted on the Origin Tableau Server, to delete the same file on the Target Tableau Server.
The major task in this step is to find out what artefacts were deleted.
Depending on the type of migration we can use one of the two following solutions:
- Find out what was deleted through the difference between the last two Git commits (applicable to both partial migration and full migration)
- Find out what was deleted through the difference between the inventory of the two Tableau Server machines (only applicable to the full migration)
The second solution is easier to implement, so if you only have full migration on your company you should choose that. If you have any partial migration you will need to choose the first one.
Git difference
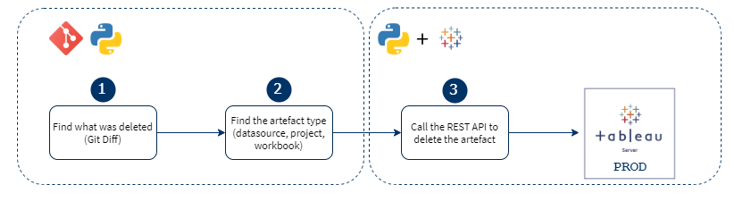
There are three major steps if you choose this approach:
1. Find out what was deleted, through the Gif Diff
2. Find out the artefact type
a. Workbooks (.twb ou .twbx)
b. Data Source (.tds ou .tdsx)
c. Projects (no extension)
3. Call the appropriate REST API to delete the artefact
Inventory difference
There are four steps if you choose this approach:
- Download the Origin Tableau Server Inventory
- Download the Target Tableau Server Inventory
- Find out what was deleted through the difference between them
- Call the appropriate REST API to delete the artefact
Final thoughts
There are some topics that this model does not cover, such as:
- Migration of extract with a size bigger than the Git file limit
- Extract/workbooks schedules
- When we migrate an extract or Workbook using the TabMigrate, the schedule is lost between the migration
A possible solution to the migration of bigger extracts is:
- Download the data source without extract
- Upload the data source, without replace the existing one
- Make a REST API call to extract the data source
- When the extract is finished, replace the old data source for the new one